convert some-image.gif -coalesce %d.jpg
the various frames have transparent areas and build upon each other, you can use the convert command with the "-coalesce" option to produce a set of files target-0.png, target-1.png etc, each of which merges the sequence of previous images
출처 : How can I split an animated .gif file into its component frames?

Friday, June 29, 2018
Thursday, June 14, 2018
Imagemagick 으로 파일 정보 얻기
다음 명령을 쓰면 된다.
identify filename.gif
다만 이렇게만 하면 gif 의 framerate 정보는 안나옴. gif 파일의 framerate 를 보려면
레퍼런스 :
how do I use Imagemagick to determine the framerate of a GIF?
How do I detect an animated GIF's ticks per second?
identify filename.gif
다만 이렇게만 하면 gif 의 framerate 정보는 안나옴. gif 파일의 framerate 를 보려면
identify -format "%T ticks: %f: Frame[%s] %m %wx%h %P%O %r %z-bit\n" anim.gif레퍼런스 :
how do I use Imagemagick to determine the framerate of a GIF?
How do I detect an animated GIF's ticks per second?
Wednesday, June 13, 2018
Friday, January 12, 2018
How to Disable Annoying Wacom Circles in Windows 10
(1) Check "Use Windows Ink"

(2) Set Registry's "HoldMode" to 3 (Default is 1)

(3) Uncheck "Enable Press and Hold~"

Reference : How to Disable Wacom Circles in Windows 10
(2) Set Registry's "HoldMode" to 3 (Default is 1)
(3) Uncheck "Enable Press and Hold~"
Reference : How to Disable Wacom Circles in Windows 10
Friday, December 1, 2017
Saturday, August 19, 2017
How to fix "undefined external error" 40201 in Sibelius
1. Go to "Play" tab -> Setup -> Click "Audio Engine Options"
2. Go to "Audio Interface" pulldown option

3. Change Audio Interface
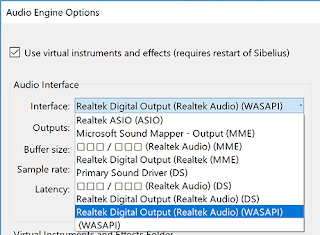
4. Restart Sibelius.
In my case, "Realtek ASIO (ASIO)" caused "undefined external error (40201)".
After Audio Interface was changed to "Realtek Digital Output (Realtek Audio) (WASAPI)",
there was no error.
2. Go to "Audio Interface" pulldown option

3. Change Audio Interface

4. Restart Sibelius.
In my case, "Realtek ASIO (ASIO)" caused "undefined external error (40201)".
After Audio Interface was changed to "Realtek Digital Output (Realtek Audio) (WASAPI)",
there was no error.
Wednesday, July 12, 2017
imagemagick 에서 gamma 조절하는 법
폴더 내 모든 이미지에 감마값을 적용하려면 다음과 같이 하면 된다.
convert *.jpg -gamma 1.85 a.jpg
이렇게 하면 gamma 값이 적용된 것들이 a0.jpg a1.jpg a2.jpg... 같은 파일들로 만들어짐.
convert *.jpg -gamma 1.85 a.jpg
이렇게 하면 gamma 값이 적용된 것들이 a0.jpg a1.jpg a2.jpg... 같은 파일들로 만들어짐.
Tuesday, July 11, 2017
imagemagick 에서 이미지들로 pdf 파일 만드는 법
convert image1.png image2.png image3.png output.pdf
convert image01.jpg image02.jpg photo.jpg -compress jpeg -quality 75 test.pdf
키워드 : images
레퍼런스 :
https://stackoverflow.com/questions/21217593/create-pdf-from-png-with-imagemagick
http://www.imagemagick.org/discourse-server/viewtopic.php?t=16771
convert image01.jpg image02.jpg photo.jpg -compress jpeg -quality 75 test.pdf
키워드 : images
레퍼런스 :
https://stackoverflow.com/questions/21217593/create-pdf-from-png-with-imagemagick
http://www.imagemagick.org/discourse-server/viewtopic.php?t=16771
Tuesday, March 7, 2017
Final Cut Pro X 에서 작은 사이즈의 파일로 export 하는 법
일단 FCPX 에서 H264 로 export 한 다음 HandBrake 로 재 인코딩하면 된다.
키워드 : 파이널컷 프로, encoding
검색어 : final cut pro x export smallest file size pineapple
키워드 : 파이널컷 프로, encoding
검색어 : final cut pro x export smallest file size pineapple
Sunday, January 29, 2017
포토샵에서 레이어 자동 변경 모드를 끄는 방법
맨 위 툴바에 옵션이 있다. Move Tool (shortcut = v) 상태에서 체크를 끄면 된다.

layer auto select 를 layer 단위로 할 것인가 group 단위로 할 것인가도 여기서 변경 가능하다.
키워드 : photoshop cc layer auto select off
layer auto select 를 layer 단위로 할 것인가 group 단위로 할 것인가도 여기서 변경 가능하다.
키워드 : photoshop cc layer auto select off
Tuesday, January 17, 2017
Extract layers from PSD with ImageMagick
psd 파일의 레이어들을 file 들로 뽑는 방법
convert image.psd image-%d.png
레퍼런스 : Extract layers from PSD with ImageMagick, preserving layout
키워드 : 파일
convert image.psd image-%d.png
레퍼런스 : Extract layers from PSD with ImageMagick, preserving layout
키워드 : 파일
Sunday, June 19, 2016
How to Rotate a Video
mp4 등 스마트폰에서 찍은 비디오 90도 회전시키는 법
1. iMovie 열고
2. video file 을 import 하고
3. crop 실행하고 여기서 좌우 회전 선택
4. Save 하려면 Share 메뉴에서 File 을 선택 (유튜브 등으로 share 도 가능)
How to Rotate a Video
With the rise of smartphone-captured video, you’ve more than likely come across a few videos that were filmed sideways..
키워드 : smartphone, iphone, galaxy, 90 degrees
Saturday, May 21, 2016
Sunday, April 24, 2016
Photoshop 의 여러 Layer 를 키보드만으로 rename 하는 방법
레이어의 이름 변경하는 단축키는 없지만 다음과 같이 하면 편하게 할 수 있다
1. 일단 하나의 레이어는 더블클릭해서 edit 함
2. 그 상태에서 tab 을 치면 다음 레이어 이름을 edit 하는 상태가 됨
3. Shift tab 치면 반대 순서로 가게 됨
The fastest way to manually rename a bunch of layers in Photoshop is to double-click / run your keyboard shortcut for “Layer” → “Rename Layer...” on one then use the tab key to apply the new layer name and jump to the next visible layer.
키워드 : 포토샵, double click, mouse, keyboard, shortcut
출처 : Faster layer renaming in Photoshop
1. 일단 하나의 레이어는 더블클릭해서 edit 함
2. 그 상태에서 tab 을 치면 다음 레이어 이름을 edit 하는 상태가 됨
3. Shift tab 치면 반대 순서로 가게 됨


The fastest way to manually rename a bunch of layers in Photoshop is to double-click / run your keyboard shortcut for “Layer” → “Rename Layer...” on one then use the tab key to apply the new layer name and jump to the next visible layer.
키워드 : 포토샵, double click, mouse, keyboard, shortcut
출처 : Faster layer renaming in Photoshop
Thursday, March 10, 2016
Pen tool 로 path 그리는 법
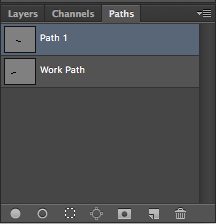 1. Pen tool 을 선택하고 curve 를 그린다
2. 펜 툴로 그린 curve 는 일반 레이어에 저장되는 것이 아니라, layers 우측의 path 탭을 보면 그곳의 레이어에 저장되어 있다.
3. 아래쪽의 속이 빈 동그라미 아이콘을 클릭하면 펜툴로 그린 커브를 따라 라인이 그려진다.
4. 라인의 두께를 조절하려면, pencil tool(핫키 B)에서 [ ] 키로 두께를 조절해주고 동그라미 아이콘을 클릭하면 된다.
참고 : 디폴트로는 펜슬 툴로 anti-aliasing 이 안된 라인이 그려지지만 안티에일리어싱이 적용된 라인을 그리려면 브러시 툴을 선택하고 동그라미 아이콘을 클릭하면 된다.
키워드 : brush tool, tab, circle, icon, bezier, drawing, line, brush, 연필 툴
검색어 : pen tool path stroke
레퍼런스 : Photoshop Help / Add color to paths
Saturday, March 5, 2016
Wednesday, February 17, 2016
mp4 file의 aspect ratio 바꾸는 법 (ffmpeg 이용)
Correct aspect ratio without re-encoding video file
There is a difference between Sample Aspect Ratio (SAR) and Display Aspect Ratio (DAR). If you want to change the video to display at 4:3, you will need to resize the image.
If you want to use FFmpeg to resize without re-encoding, try:
ffmpeg -i [INPUT] -s 720x540 -c copy [OUTPUT]
You can also try changing just the DAR with:
ffmpeg -i [INPUT] -aspect 720:540 -c copy [OUPTPUT]
키워드 : 가로세로비, 비율
검색어 : mp4 ratio
Subscribe to:
Posts (Atom)